OTP#
Overview#
One of the best ways to increase authentication security is to require two factor authentication (2FA). One of the more popular options is to use one-time passwords (OTP). This technique began in the proprietary space, but over time some open standards emerged (HOTP: RFC 4226, TOTP: RFC 6238).
This project adds support for these standard OTP mechanisms to FreeIPA.
One unique challenge of this project is to provide a mechanism to permit gradual migrations from proprietary technologies to their related open standards. Since nearly every proprietary technology supports the RADIUS authentication protocol, we provide a way to proxy OTP requests to their proprietary RADIUS servers. This provides a path for gradual migration.
Use Cases#
Native OTP Support#
All tokens used with FreeIPA native OTP support must implement either HOTP (counter-based; RFC 4226) or TOTP (time-based; RFC 6238).
Administrator-Managed Hardware Tokens#
Two types of hardware tokens exist: programmable and non-programmable. Both types are often purchased by an administrator in bulk and then assigned to a user. An administrator enables token support for a user (or globally) and adds hardware token(s) to the user’s account. These hardware tokens work right away – no user configuration is required. So on the first login, both password and a token code are required. While the user can view this token, he or she does not manage it. Hence, no modifications should be permitted.
Programmable Tokens#
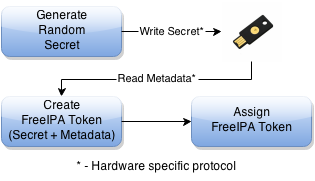 Programmable hardware tokens are generally
programmed with fresh random data at the time they are assigned to the
user by the admin. FreeIPA will provide a command to generate any needed
random secret, create the FreeIPA token and assign it; all as one single
step. For most programmable tokens, the hardware specific protocol used
to write the secret and read the metadata will be left as an exercise to
the administrator. However, for some programmable tokens which have
adequate open source support, such as YubiKeys, FreeIPA will provide a
single command which automates the entire process (CLI-only due to
browser limitations).
Programmable hardware tokens are generally
programmed with fresh random data at the time they are assigned to the
user by the admin. FreeIPA will provide a command to generate any needed
random secret, create the FreeIPA token and assign it; all as one single
step. For most programmable tokens, the hardware specific protocol used
to write the secret and read the metadata will be left as an exercise to
the administrator. However, for some programmable tokens which have
adequate open source support, such as YubiKeys, FreeIPA will provide a
single command which automates the entire process (CLI-only due to
browser limitations).
Non-programmable Tokens#
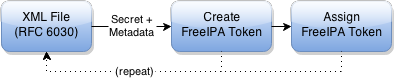 The non-programmable token vendor will
provide a digital record of the tokens’ secrets and metadata (usually in
an RFC 6030 XML file). The administrator should be able to execute a
server-side command (CLI-only; not generally available to regular users)
to import all of these tokens in a single pass. This may or may not
require per-user assignment after the import is complete.
The non-programmable token vendor will
provide a digital record of the tokens’ secrets and metadata (usually in
an RFC 6030 XML file). The administrator should be able to execute a
server-side command (CLI-only; not generally available to regular users)
to import all of these tokens in a single pass. This may or may not
require per-user assignment after the import is complete.
User-Managed Tokens#
An administrator enables token support for a user (or globally) but does not create any software tokens. The user is able to log in with just the standard pre-defined password. Upon login, the user is able to create software tokens in either the UI or CLI and provision them on a smartphone or tablet using a QR code. After the first token is created, subsequent logins require both password and a token code. The user should retain full control of the token details, including most metadata fields. Users should be able to create, edit or delete any of these tokens so long as at least one active token remains. Attempts to delete or deactivate the last active token should fail (active means not disabled and within the specified validity time window).
One alternative to this scenario is the use of BYOD programmable hardware tokens. These devices are exactly like the programmable hardware tokens specified in the previous use case and all the above criteria apply except that they must be created and managed by the user like software tokens. Programming of hardware tokens will be CLI-only due to browser limitations.
Token Synchronization#
If a token goes out of sync, the user should be able to re-synchronize it. This should be possible regardless of what type of token it is and whether or not the user has the ability to modify the token. This should be possible on both the UI, via a helpful link on the login page, and the CLI, without having to log in via Kerberos. The general process for this is that the user must enter his or her password and two token codes in a row. This confirms possession of the token.
Proprietary OTP Support#
Many administrators will be migrating from a proprietary OTP solution to the FreeIPA integrated OTP support. However, for large deployments, an all-at-once migration is often not possible. FreeIPA should handle this case by providing a way to offload OTP validation to a 3rd-party RADIUS server for a subset of the users.
To handle this, an administrator can create a set of RADIUS proxies (each proxy can contain multiple individual RADIUS servers). A user can be assigned to one of these proxies. While a user has a RADIUS proxy assigned, all other mechanisms are bypassed. When the user is ready to be migrated to the FreeIPA native OTP system, the RADIUS proxy assignment for the user is simply removed.
FreeIPA provides no token management or synchronization support for tokens in the 3rd-party system.
Design#
High-Level Architecture and Workflow#
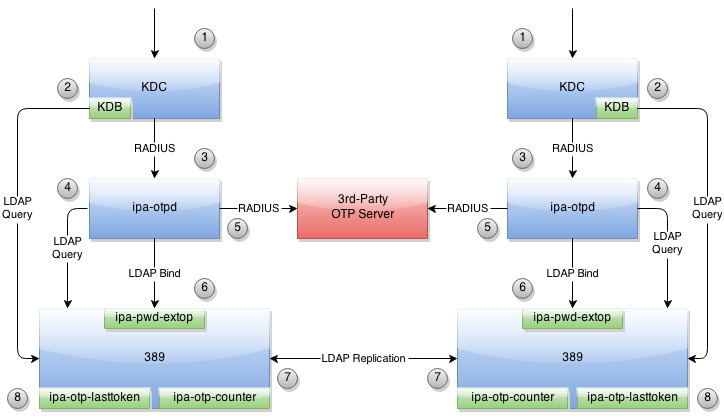
FreeIPA_OTP.png#
An incoming Kerberos authentication request is received.
As in all Kerberos requests, the user’s information is loaded from LDAP using the FreeIPA KDB plugin. This process will be augmented to determine if OTP is required for the user.
If the previous check indicates that OTP authentication should be used, the request will be forwarded to the ipa-otpd process using MIT krb5’s OTP-over-RADIUS support.
The ipa-otpd process will search LDAP to see if 3rd-party RADIUS or native OTP support is configured for the user.
If the user is assigned to a 3rd-party RADIUS server, the request will be forwarded immediately for validation. A mechanism will be available to translate from the FreeIPA username to the username expected by the 3rd-party RADIUS server. All other authentication methods will be ignored. Note that this applies for kerberos authentications only. When using RADIUS mode, LDAP binds will still require the single factor configured for the user in LDAP and will not reference the RADIUS second factor at all.
Otherwise, an LDAP bind will be attempted to engage FreeIPA’s native OTP support. This support is implemented in the ipa-pwd-extop plugin for the 389 directory server.
After the authentication is successful, a token’s counter or watermark will be incremented. The ipa-otp-counter plugin guarantees that all counter modifications are locally atomic, preventing simultaneous multi-use of the token on a single server. To provide similar protection on other servers, the counter/watermark will be replicated. Until this replication is processed on the remote server, it is possible the token might be reused there. However, the ipa-otp-counter plugin also detects any counter discrepancies and repairs them immediately, guaranteeing eventual consistency.
A third 389 directory server plugin (ipa-otp-lasttoken) is used to ensure that no user can delete or disable the last active token assigned to him or her.
Authentication Methods#
In order to provide fine-grained controls over which authentication methods are available to which users we have developed a notion of User Auth Types. The User Auth Types can be set globally or on a per-user basis and indicates which authentication methods are allowed. Because this attribute is multi-valued, setting multiple values indicates a logical OR. In other words, any of the specified methods may be used.
The following User Auth Types are defined (but not all may be implemented):
passwordotppkinitradiusdisabled(global only)
If no value is set, password is assumed.
Note well that otp means “use a password and an otp value.” If only
otp is set, password-only authentication will be allowed only when
the user has no tokens defined.
The disabled value can only be set globally and forces the user of
“password” on all users, regardless of their per-user settings.
Token Synchronization#
HTTPS#
Support for synchronizing a token is available at /session/sync_token using a POST request. This request takes the following parameters:
user - Your username
password - Your first factor (password)
first_code - The current token code
second_code - The next token code
token - The name of the token (optional)
Take care not to expose this URL in any way without TLS since your password is sent over the wire.
The result of the operation is returned in the X-IPA-TokenSync-Result header.
LDAP Bind Control#
Token synchronization is available via a bind control when doing a simple bind. The OID of the control is: 2.16.840.1.113730.3.8.10.6. The ASN.1 is:
OTPSyncRequest ::= SEQUENCE {
    firstCode   OCTET STRING,
    secondCode  OCTET STRING,
    tokenDN     OCTET STRING OPTIONAL
}
Permissions#
Tokens have either zero or one owner. If a token has no owner it is considered unassigned. A token’s owner can do the following with the token:
read
authenticate
synchronize
Tokens may have zero or more managers. A token’s manager may:
read
write
delete (if token is self-owned, cannot delete last active token)
Admins can create tokens that are either unassigned/unmanaged or are owned and/or managed by any user. Users can create tokens if and only if they are self-owned and self-managed.
Only administrators may change the User Auth Type (globally or per-user).
Helpdesk#
One tricky situation that is not yet accounted for is the helpdesk scenario where a non-admin needs to perform some tasks related to tokens. As a philosophy, the helpdesk role should not be able to perform tasks that users can perform themselves. The proper response here is organization-specific documentation and training. This makes for self-sufficient users, lowering helpdesk costs.
Here is a list of possible helpdesk tasks:
Bulk token import (assigned or unassigned)
Creating a programmable / software token on behalf of a new user (before first login)
Manually adding / assigning a fixed-secret hardware token
Changing the per-user auth type
Deleting a user’s last active token
Editing a non-owner-managed token information
Special care needs to be taken care to ensure that a member of the helpdesk staff cannot create a new token for a user with higher privileges (such as an admin). Doing so would make an escalation attack feasible by compromising only the first factor and creating a new second factor token.
A similar escalation attack is allowed if the helpdesk staff can disable OTP for a user with higher privileges, either via deleting the user’s last active token or by changing the per-user auth type.
Implementation#
Mixing the “password” and “otp” user auth types should not be used. It currently works in LDAP, allowing either password or password+otp login. However, it is not currently supported in krb5 where “otp” will be forced. Support for mixed mode Kerberos authentication is in progress.
FAST support is currently required on the client to enable OTP authentications. You get this for free when using a setup like SSSD. However, kinit will not work without some additional configuration.
While IPA supports specifying multiple RADIUS proxy servers in LDAP, ipa-otpd only uses the first returned server defined for the proxy. As a work-around, DNS round-robin can provide failover support. For details, see the bug.
Upon testing, OTP works exactly the same for compat tree binds as it does for regular binds.
Feature Management#
UI
Authentication Methods#
System-wide authentication methods will be available on the Server settings tab.
Per-user authentication methods will be available on the User’s detail page.
RADIUS Proxy Server Configuration#
Administrators will have the RADIUS Servers tab available for managing RADIUS proxy servers. These servers can be assigned to individual users on the specific user’s detail page.
OTP Tokens#
A tab for managing tokens will be available on the user self-service page. This will permit the addition, deletion and editing of self-assigned/managed tokens.
Administrators will receive a similar UI for managing tokens for all users.
A link to a synchronization page is provided at the FreeIPA login page.
CLI
Existing Commands Modified#
Command |
Options |
|---|---|
config-mod |
–user-auth-type=password/otp/radius |
user-mod |
–user-auth-type=password/otp/radius –radius=STR –radius-username=STR |
New RADIUS Proxy Commands#
Command |
Options |
|---|---|
radiusproxy-add |
–desc=STR –server=STR –secret –timeout=INT –retries=INT –userattr=STR |
radiusproxy-find |
–name=STR –desc=STR –server=STR –timeout=INT –retries=INT –userattr=STR |
radiusproxy-mod |
–rename=STR –desc=STR –server=STR –secret –timeout=INT –retries=INT –userattr=STR |
radiusproxy-del |
|
radiusproxy-show |
New OTP Token Commands#
Command |
Options |
|---|---|
otptoken-add |
–type=STRENUM –desc=STR –owner=LOGIN –disabled=BOOL –not-before=STR –not-after=STR –vendor=STR –model=STR –serial=STR –key=STR –algo=STRENUM –digits=6/8 –offset=INT –interval=INT –no-qrcode |
otptoken-add-managedby |
–users=STR |
otptoken-add-yubikey |
–desc=STR –owner=LOGIN –disabled=BOOL –notbefore=STR –not-after=STR –digits=6/8 –slot=1/2 |
otptoken-del |
|
otptoken-find |
–type=STRENUM –desc=STR –owner=LOGIN –disabled=BOOL –not-before=STR –not-after=STR –vendor=STR –model=STR –serial=STR –algo=STRENUM –digits=6/8 –offset=INT –interval=INT –id=STR |
otptoken-mod |
–rename=STR –desc=STR –owner=LOGIN –disabled=BOOL –not-before=STR –not-after=STR –vendor=STR –model=STR –serial=STR |
otptoken-remove-managedby |
–users=STR |
otptoken-show |
|
otptoken-sync |
–user=STR –password –first-code –second-code |
OTP Import Command#
ipa-otptoken-import [-k KEYFILE] <PSKC file> <output file>
This command imports the tokens specified in the PSKC (RFC 6030) file. This command must be run on the IPA server by the admin. If the tokens in the PSKC file are encrypted, the -k option MUST be specified. Any tokens which fail to add will be written to the output file. This permits the admin to review the tokens which failed, correct any problems in the data file and re-import them.
Replication#
It is at least theoretically possible that a server could issue a replication request with a lower counter or watermark value but a higher CSN. In order to guarantee eventual cluster consistency and to ensure that higher counter/watermark values do not get erased, the ipa-otp-counter plugin will enforce the highest counter/watermark value and issue fix-up replications if an error is detected.
New Dependencies#
python-qrcode
python-yubico (implicit: pyusb)
libverto-devel
How to Test#
Configuration#
Creating a User#
We need to create a user to use when testing OTP. For the duration of
this guide, I will call this user: otpuser.
$ kinit admin
Password for admin@EXAMPLE.COM:

$ ipa user-add otpuser
First name: OTP
Last name: User
--------------------
Added user "otpuser"
--------------------
  User login: otpuser
  First name: OTP
  Last name: User
  Full name: OTP User
  Display name: OTP User
  Initials: OU
  Home directory: /home/otpuser
  GECOS: OTP User
  Login shell: /bin/sh
  Kerberos principal: otpuser@EXAMPLE.COM
  Email address: otpuser@example.com
  UID: 1181600140
  GID: 1181600140
  Password: False
  Member of groups: ipausers
  Kerberos keys available: False

$ ipa passwd otpuser
New Password:
Enter New Password again to verify:
------------------------------------------
Changed password for "otpuser@EXAMPLE.COM"
------------------------------------------

$ kinit otpuser
Password for otpuser@EXAMPLE.COM:
Password expired.  You must change it now.
Enter new password:
Enter it again:
Enabling OTP and RADIUS#
Before OTP or RADIUS can be used, they needs to be enabled (either
globally or per-user). This involves setting the User Auth Type to
otp and/or radius either via the UI or the CLI:
CLI |
|
|---|---|
Globally |
|
Per-User |
|
UI |
|
Globally |
IPA Server -> Configuration -> Default user authentication types |
Per-User |
Identity -> otpuser -> User authentication types |
Logging In#
Default Method#
Kerberos FAST is required for OTP operations. SSSD performs this
configuration automatically, so su - otpuser should work out of the
box. Testing with this method is preferred as it will test SSSD OTP
support as well.
kinit Method#
If you need to test with kinit, you will need to enable FAST manually. The easiest way to configure FAST manually from the command line is to kinit as a non-OTP user, then run klist to show the location of the ticket cache. Once you have done this, you can kinit as your OTP user using the -T option. For example:
$ kinit admin
Password for admin@EXAMPLE.COM:

$ klist
Ticket cache: KEYRING:persistent:1000:1000
Default principal: admin@EXAMPLE.COM

Valid starting       Expires              Service principal
11/03/2014 15:38:43  11/04/2014 15:38:41  krbtgt/EXAMPLE.COM@EXAMPLE.COM

$ kinit -T KEYRING:persistent:1000:1000 otpuser
A failure to properly configure FAST will result in the following error message once OTP is configured:
$ kinit otpuser
kinit: Generic preauthentication failure while getting initial credentials
Upstream work is ongoing to remove the need for FAST.
Self-Managed Tokens#
Software Tokens#
Make sure you have FreeOTP Android or iOS installed.
Adding a token is easy. If you are logged in as otpuser, you can
create a self-managed software token by running ipa otptoken-add.
Alternatively, you can do this via the UI: OTP Tokens -> Add. After
adding the token via either method, simply scan the QR code with
FreeOTP.
Now your token is provisioned. Try to log in (V4/OTP#Logging_In). Remember to enter both your password and your token code (in the form ). This should work without problem. Now, try to log in again with the same password and token code. This should fail since the OTP code was already used.
Feel free to add, edit and delete as many tokens as you’d like. You can try this with both HOTP and TOTP tokens. Notice that you are not permitted to remove the last active token.
Programmable Hardware Tokens#
This test will require a YubiKey token.
Because of browser limitations, this command is only available on the
CLI. Insert your YubiKey token and run: ipa otptoken-add-yubikey. If
your YubiKey has an empty slot, the command will pick it automatically.
Otherwise, you will need to use the --slot argument to choose a slot
to overwrite.
This token should work exactly the same as a software token in the previous example. All the same policy should apply.
Admin-Managed Tokens#
Administrators can create tokens on behalf of normal users. When this happens, the user has read-only access to the token metadata.
To test this, make sure you log in
(V4/OTP#Logging_In) as the admin user. You
can test this with either a software token using FreeOTP or a YubiKey
Programmable Hardware token. The test procedure is exactly the same as
the above self-managed tokens except that you need to add the
--owner=otpuser option when adding a token assigned to someone else.
Notice that when you log back in
(V4/OTP#Logging_In) as otpuser, these tokens
work for authentication, but you are unable to modify them in any way.
Importing Tokens#
Testing the importing of non-programmable hardware tokens is much more
difficult. It requires access to a hardware token and its
secret/metadata XML file. You can test some fake imports using the
files: ipatests/test_ipaserver/data/*.xml. However, you will not be
able to test their functionality since this data does not correspond
with an actual hardware token.
Token Synchronization#
Currently, the authentication window is hard-coded at 3 steps/periods. There is a patch to make this configurable.
To make your token go out of sync simply:
click your HOTP token more than 3 times.
write down the TOTP code and wait more than 3 periods.
Try to log in with this bad code to confirm failure. To synchronize, run
ipa otptoken-sync or click the “Sync OTP Token” link on the Web UI
Login page.
RADIUS Proxy#
To test the RADIUS proxy support, you will need access to a RADIUS server.
Make sure that the
radiusUser Auth Type is enabled (V4/OTP#Enabling_OTP_and_RADIUS).Add a RADIUS proxy:
ipa radiusproxy-add testproxy(follow instructions)Assign a user to this proxy:
ipa user-mod radiususer --radius=testproxyIf needed, configure the username to send to RADIUS:
ipa user-mod radiususer --radius-username=myradiususerLog in (V4/OTP#Logging_In)
Test Plan#
Dependencies#
For tests, we will require the python-pyotp package. This provides an independant implementation of OATH (TOTP/HOTP) to test against.
Test Outline#
Preparation#
Create a normal user
Ensure the user can login 1FA
Global OTP Test#
Enable OTP globally
Ensure the user can login 1FA
Create two tokens for the user: TOTP, HOTP
Ensure the user cannot login 1FA
Test TOTP:
Ensure the user cannot login with a past code beyond the auth window
Ensure the user can login with a past code within the auth window
Ensure the user can login with the current code
Ensure the user cannot login with the current code again (rapidly)
Ensure the user can login with a future code within the auth window
Ensure the user cannot login with a future code beyond the auth window
Test HOTP:
Ensure the user can login
Ensure the user cannot login with the same code (rapidly)
Ensure the user cannot login with an old code
Ensure the user cannot login with a future code beyond the auth window
Ensure the user can login with a future code within the auth window
Cleanup
Local OTP Test#
Enable OTP per-user
Ensure the user can login 1FA
Create two tokens for the user: TOTP, HOTP
Ensure the user cannot login 1FA
Test TOTP:
Ensure the user cannot login with a past code beyond the auth window
Ensure the user can login with a past code within the auth window
Ensure the user can login with the current code
Ensure the user cannot login with the current code again (rapidly)
Ensure the user can login with a future code within the auth window
Ensure the user cannot login with a future code beyond the auth window
Test HOTP:
Ensure the user can login
Ensure the user cannot login with the same code (rapidly)
Ensure the user cannot login with an old code
Ensure the user cannot login with a future code beyond the auth window
Ensure the user can login with a future code within the auth window
Cleanup
User Permissions Test#
Login as the user.
Ensure the user can create self-managed TOTP, HOTP tokens
Ensure the user cannot create a non-self-managed token
Ensure the user cannot delete the last active token
Ensure the user can synchronize the token
Ensure admin can delete user’s last active token